Removing rust – abrasive methods

Abrasive rust removal comes in one of three forms: rubber “erasers”, Dremel-type abrasive brushes, and wet-and-dry abrasive paper. There are other methods which can be used from an abrasive viewpoint – a wire wheel (quick, but extremely abrasive), or sandblasting (quick, but leaves a rough finish). The caveat with abrasives is that used incorrectly, they can lead to surfaces scratches on the tool. Finer grades of abrasives lend themselves more to polishing than the core rust removal.

Rust Erasers

These “magic” rust erasers, the most common of which is the Sandflex (made by Klingspor), remove rust from cast iron and steel. They are semi-flexible rubber blocks with grit impregnated uniformly in the block. They come in three grit sizes: coarse (60 grit), medium (120 grit) and fine (240 grit).

sandflex_block

Fig 1: The three sandflex blocks

There is also a similar block (Sabitoru) made in Japan, and geared more towards rust removal on knives (especially high carbon knives). Unlike the Sandflex eraser, which can be used wet-or-dry, the Japanese eraser should be soaked in water for 5-10 minutes before using (they come in fine, medium and rough grits).

sabitoru_block

Fig 2: Close-up of the sandflex fine-grit, and the Japanese Sabitoru blocks (fine and rough).

In either case, identifying the “grain” of the steel is important to avoid abrasion marks. Here is an example of using a Sandflex fine grained block on the edge of the crank wheel on a Millers Falls hand-drill.

sandflex_eg1

Fig 3: Using the sandflex fine block on surface rust

Figure 4 shows an example of using the coarse sandflex block on the sole of a block plane with a medium coating of surface rust. After 30 seconds of “erasing”, the surface rust has been removed. My recommendation would be to apply chemical rust removal to heavily rusted parts, and delegate the erasers to tasks which involve light to medium surface rust.

sandflex_eg2

Fig 4: Example of using sandflex on a plane sole

Abrasive Brushes

For oddly shaped tools, another option is the “detail abrasive brush” for the Dremel. These work on the same basic principle as the Sandflex blocks, rubber bristles embedded with an abrasive and a polishing compound. The brushes come in three grits: Coarse 36 grit (brown), Medium 120 grit (white), Fine 220 grit (red).

abrasive_brushes

Fig 5: Dremel abrasive brushes

An example of how well these brushes work is shown in Fig.6. Each brush does a good removing surface rust from the sole of a block plane, however the 220 grit provides an extremely finely polished surface. Although these brushes are soft, they do tend to leave linear brush marks on the surface, and as such I wouldn’t recommend using them as a “final” surface.

brushes_eg1

Fig 6: Examples of using the abrasive brushes

There is also a second type of Dremel accessory –  abrasive buffs which come in 180 (dark brown), 280 (light brown), and 320 (purple) grit. They are made of non-woven fibres impregnated with aluminum oxide and silicon carbide. These buffing wheels do remove light surface rust, at a quicker pace than the abrasive wheels, however at the expense of wearing out extremely quickly. Fig. 7 shows two of the buffs, and a sample of their use on the sole of a block plane with surface rust. Both grits produced a clean surface, with the 280 grit polishing the sole.

abrasive_buffs

Fig 7: Dremel abrasive buffs

Abrasive Paper

Abrasive paper for rust removal is normally in the form of silicon carbide – partially because it can be used either in a wet or dry state. Sandpaper can be an extremely effective corrosion removal method, but it requires patience, and a move through successive grades from coarse to fine. Coarse papers such as 80-120 grit remove heavy rust build-up, 200-400 for medium rust, and 600-1000 for removing light rust. Rust removal in this manner requires sanding in the direction of the metal. The benefit of silicon carbide is that finer grades of paper actually will polish the metal.

Thoughts?

I have used various abrasive methods over the past two years, and  will elaborate more on testing these in a future post. What have I learnt? The Sandflex rust erasers work well on light to medium surface rust and do not overly scratch the surface of the metal. They also work well in places where the use of chemical rust removers, or the use of abrasive paper is difficult, e.g. the hand drill example shown in Fig.3. The same goes with the abrasive brushes, although these work fast. How well they work on different metals is to be determined. The abrasive buffs are more for polishing, as I imagine that although they do a great job on surface rust – using them could become cost prohibitive as they wear out quickly. I haven’t said much about abrasive papers – mainly because they do work, and are cheap – and come in enough grits to go from rust removal to fine polishing. Stay tuned – more to come (I just need to find some more really rusty tools)!

Availability: I bought the Sandflex blocks at Lee Valley (C$15.95 or US$14.95 for a set of 3), the Japanese Sabitoru I bought at Tosho Knife Arts (C$9 a piece).

A steel block plane from Shelton

On Saturday I attended the Lee Valley vintage plane sale at their new Toronto store. There were a *lot* of wooden planes, mostly moulding planes, and some some others – at bargain prices. I spent a grand total of $15 – $10 on a 7″ “block” sized coffin smoother, and $5 on a steel Shelton block plane.

shelton_18

Fig 1: The Shelton No.18

The Shelton is an odd piece, and mimics the Stanley No.118 steel block plane (with a number of 18). The Shelton Plane & Tool Mfg Co. was founded in 1862, in Shelton, Connecticut, and originally made baskets. They started production of planes in the early 1930’s coinciding with two patents granted in 1933. The patent for the block plane was awarded in 1947 (Patent No. 2,423,713), so the block plane itself could have been in production from the early 1940s (assumed by the patent pending mark on the blade).

shelton_steelBP

Fig 2: Patent for the Shelton block plane

The plane’s body is made of two  pieces of pressed steel, the body, and the rigid support sub-structure which holds the depth adjustment mechanism, and the pin for securing the lever cap. The inside of the body and lever cap were painted black originally. The knurled thumbwheel for blade depth adjustment (Fig.1(26)), lever cap thumbwheel knob (31), and auxiliary hand grip (40) are all made of cast aluminum. The holes on the side of the plane to improve grip through the placement of a thumb and finger are straight (not bevelled as in the Stanley No.118).

shelton_pressedST

Fig 3: The pressed steel structure

The knob on the front of the plane is made of aluminum, and has a tenuous connection to the sole of the plane – i.e. it stays in position when pressure is applied, but easily detaches. Due to the obvious differences in materials, soldering it was not an option (it could likely be epoxied in place though).

shelton_118vs18

Fig 4: Shelton 18 vs. Stanley 118

An obvious copy of the Stanley No.118, the plane does differ in certain ways. The Stanley blade is bedded on a 12° angle, whereas the Shelton has a 15° bed. The blade adjustment mechanism is also completely different, as per the patent, with the only difference from the patent being that in the production run, the securing screw for the blade, with its unusual laterally bent grip has been replaced by a stud. On the No.118, the knobs and thumbwheels are plated brass, on the No.18 they are aluminum. The lever cap on the 118 is painted, the one on the 118 is plated (although traditionally black paint was the finish on the No.118’s). Interestingly, there does not seem to be a patent for the Stanley 118 which was released in 1933, and although there are differences the planes are *very* similar.

Shelton No.18 (1940s-1950s)
Plane length: 6″ sides, (6 3/8″ centre toe to heel)
Width: 1 7/8″
Blade width: 1 5/8″
Blade angle: 15º
Weight:
 430g (15 oz.)
Material: pressed steel
Depth adjustment: thumbscrew
Lateral adjustment: n/a
Throat adjustment: n/a
Patent: 2,423,713

Tool restoration – Rust 102 (types of rust)

Rust takes many forms, as shown in this study of a  Stanley No.103. Apart from the loss of Japanning, this plane suffers from the most extreme of corrosive agents.

rusty102_types

Fig 1: The rusty 103

Stable Rust

Sometimes rust is referred to as being stable. Stable rust is well adhered rust caused through a lifetime of exposure. This is the type of rust most often found on tools. It is associated with low relative humidity, but enough for rust to accumulate over time. The rust is more or less uniformly distributed over the entire exposed surface of the metal. Exposure to continuous moisture will lead to more degradation over time. Given long enough (years of improper care), sometimes stable rust can form a patina-like coating.

uniform_patina

Fig 2: Uniform rusting and the patina that forms over time.

Flash Rust

Localized rusting occurs when water remains on one spot. Flash rust is rapid rusting after exposure to high humidity (i.e. flooding) – it is usually bright orange. Flash rust often occurs on parts that have been de-rusted, only to be washed in water, and not dried properly. Fig. 3 (left) shows an example of a blade which was sprayed with water – the flash rust formed in a 6-8 hour period.

flash_rustB

Fig 3: Flash rust

Flaking Rust

Ferric oxide can take up more volume than the metal is replaces resulting in flakes spalling from the surface. Fig.4 (left) shows a blade (from the Stanley No.102) with rust spalling on the surface. The image in Fig.4 (right) is the sole of a plane with flaking rust.

rust_flaking

Fig 4: Flaking rust

Rust which forms under a protective finish such as paint or Japanning, typically causes the finish to flake off. This often occurs in regions where there is a break in the finish, such as the heel of a plane. The examples in Fig. 5 clearly show the finish on two different planes spalling off, at the heel of the plane where the finish ends, and the transition from finish to raw metal is exposed.

rust_finish

Fig 5: Flaking finish

Pitting

Pitting is corrosion which takes the form of cavities, covering a wide area, and can be one of the most damaging forms of corrosion. Pitting is caused by a localized lack of oxygen in the metal – this causes the area to readily give up electrons to surrounding areas with more oxygen (which accept the electrons more readily), and accelerate the rusting process. The images in Fig. 6 show some extreme pitting on a block plane. The first image (left)  shows pitting on the sole of the plane, and the other (right) acute pitting on the blade depth adjustment mechanism.

rust_pitting

Fig 6: It’s the pits!

Susceptibility to Rust

The regions of a tool most susceptible to rust are those where moisture can become trapped. Other regions of a plane susceptible to rust are the non-finished regions of the inner body, such as where the blade is supported near the bed (Fig.7).

rust_suscep

Fig 7: Rusting on the bed of the plane

The image in Fig. 8 (left) shows the blade depth adjustment mechanism on a block plane – both the adjusting lever and machine screw shows signs of corrosion. Just because a knob, or lever is “plated” does not mean it is not susceptible to corrosion. The photograph in Fig. 8 (right) shows how rust has assaulted the fine [depth adjustment] grooves on the back of the blade. Small detailed crevices are often the most seriously affected regions, due to their propensity to trap moisture.

rust_suscep2

Fig 8: Susceptibility to rust

Methods of rust removal

Removing rust can be done in numerous ways, but they basically fall into two categories: abrasive or chemical . Abrasive means include the use of rust “erasers”, abrasive paper, and devices such as the Dremel “detail abrasive brush”. Chemical implies some form of liquid or gel rust remover, or electrolysis.

Next post: Abrasive rust removal

Provenance of a clone – a combination plane

This review is about a combination plane I bought on Etsy – and marked as a Stanley in the ad. A quick comparison of the features in the online pictures made me believe it was more likely a Sargent. The plane is in excellent condition, and likely only used once or twice. Different views of the plane are shown in Fig.1.

sargent1080_views

Fig.1: Views of the Craftsman combination plane

Some characteristics:

Size: 10 3/4″ long
Cutters: 23 (9 beading, 10 plow/dado, 1 rabbet and filletster, 2 tonguing, and a sash cutter).
Construction: Cast iron, mahogany fence strip and handle
Finish: Nickel plated
Rods: 2 sets – 4 1/2″, 8 1/4″

First look for identifying markers, patent number and dates, etc. These often tell a lot about what time period the tool is from. The only markings on the plane were “MADE IN U.S.A.”, the trademark “CRAFTSMAN”, and the labels “A”, “B”, and “D” (on each of the core components).

sargent1080_markings

Fig 2: Plane markings

The first step is narrowing the manufacturer down. Many companies such as Sears had planes made by a number of manufacturers, so this can be a challenging step, although cloned tools were often very similar to a companies own branded tools. The easiest way is to compare the physical features of the plane against catalog pictures. The combination plane in question has two identifying attributes. Firstly, it does not have a cam rest, so that rules it out as being a Stanley (latter models of Sargent combination planes were made by Stanley). Secondly, although the Sargent 1080 was a cosmetic copy of the Stanley 45, it had a vastly different method of cutter placement in the adjusting wheel (related to Patent# 1166437, Herbert G Collins, 1916) (see Fig.3).

sargent1080_adjwheel

Fig 3: Sargent blade adjustment thumbscrew

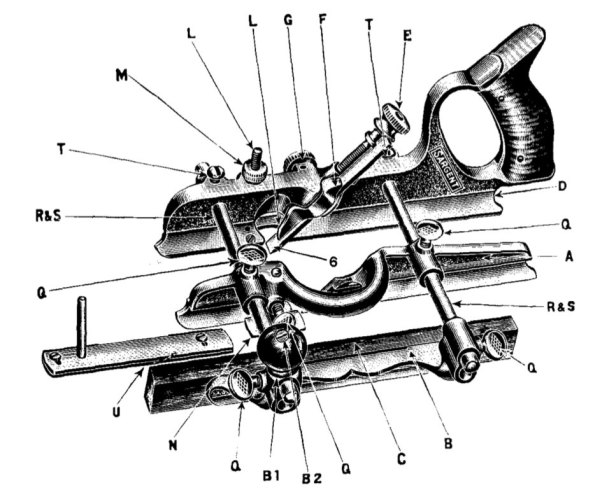
The labels “A”, “B”, and “D” correspond to the movable bed, fence and bed of the plane, as outlined in the schematic.

1080_diagram

Fig 4: Sargent 1080 schematic

The plane is obviously a Sargent model 1080 clone, identified as a Craftsman 3728. This was verified when, just be chance, I removed the wood from the fence. What appeared underneath – “1080” stamped in the bed of the fence.

sargent1080_mark

Fig 5: The hidden ID marker!

Once the make of the plane is identified, and the model, and appropriate timeframe should be determined. To achieve an accurate date ideally requires access to catalogs from a series of years. An accurate date is not that critical, unless you are interested in the planes value. The Craftsman tool line did not appear until 1927, and the plane in question did not appear in the 1960 catalog.

Heckel identifies six 1080 models in his identification guide.

1080
1916-1942, 25 cutters (9 beading), nickel-plated – no fence knob
1942-1943, 23 cutters (7 beading), silver paint, black nitrate on screws
1949-1953, 23 cutters (7 beading), nickel plated

1080PB
1926-1927 25 cutters (9 beading), nickel-plated – no fence knob
1928-1943 23 cutters (7 beading), nickel-plated
1944 22 cutters (7 beading), silver paint, black nitrate on screws

Three are the PB versions, related to the fact that the plane came in a pasteboard box rather than a wooden box. Considering the nature of the box this came in, it is possible that it is a custom-built box to replace the pasteboard version. With the 1080, a number of markers can help narrow down the date – absence of a knob of the fence and the number of cutters (although this may have been modified for a clone). Early versions of the 1080 (1916-1942) did not have a knob on the fence, so they can be ruled out. This particular clone has 23 cutters, of which 9 are beading cutters. It may not be a war-era plane, some of these were painted silver with black nitrate on the screws, rods and depth stop.

Looking at a 1080/1085 instruction guide from 1943, the plane only had 22 cutters. Another guide places the number of cutters at 23, with a 1-to-1 match to the list. So the combination plane is a Sargent, with an indeterminate time-frame, likely post-war.

P.S. For a discussion on a Stanley manufactured Craftsman clone, check out this website.

Tool restoration – Rust 101

When restoring a tool of any sort, the first step (after disassembling it) usually involves dealing with surface oxidation, or rust.

What is rust?

Rust is a general term used to describe a family of iron oxides. Rust is the weakening of iron that results from oxidation of its atoms, essentially a form of electrochemical corrosion. Rust forms in the presence of air (oxygen) and water – if one of them is missing, rust doesn’t form.

How does rust form?

Now to the chemistry of rust. Assume a drop of water placed on a piece of iron.

When water containing dissolved oxygen comes into contact with iron, the iron (Fe) in the middle of the drop begins to oxidize, loosing electrons.

Fe(s) → Fe²+(aq) + 2e-

Near the outer surface of the drop, water and oxygen receive the electrons and form hydroxide ions:

O2(g) + 2H2O(l) + 4e- → 4OH- (aq)

The hydroxide (OH-) ions react with the iron (II) ions to produce iron (II) hydroxides, sometimes known as green rust.

Fe²+(aq) + 2OH-(aq) → Fe(OH)2(s)

The iron (II) hydroxide is then oxidized by air, and converted to hydrated iron (III) oxide. The iron (II) hydroxide reacts further with oxygen and water to form hydrated iron (III) oxide = rust.

4Fe(OH)2 (s) + O2 (g) + 2H2O (l) → Fe2O3 · 3H2O(s)

Rust Experiments

To illustrate how  rust forms, I put together some experiments. In the first experiment I placed some absorbent cotton disks in the base of a glass jar, and sprayed in some water. Then I added a block plane blade with some old rust spots – the sealed jar acts like a high humidity environment.  I left the jar alone or three weeks. Surface rust formed easiest in regions of the blade where there were abrasions, existing “stable” rust, or areas where moisture collects, such as  the grooves in the back of the blade. These regions of rust, as shown in Fig.1, fan out in almost fractal-like patterns. This is typical of rust formed in high humidity environments.

rust_exp3

Fig 1: Rust experiment 1 – plane blade in a high humidity environment.

In the second experiment I submerged another blade in a sealed jar of water. This jar was left for three weeks as well. The result was a jar containing a reasonable amount of rust in suspension – hydrated iron (III) oxide. The images in Fig.2 show the amount of rust on the blade once the blade was removed from the water. The lower-right image shows the colour of the water and suspended material after the blade was removed. The  glass jar ended up with being quite stained by the process.

rust_exp2

Fig 2: Rust experiment 2 – plane blade suspended in water.

Once the rust residue was cleaned off the blade, the area covered by the rust was shown to have converted to black rust. The image shown in Fig.3 shows the boundary of black rust region with the portion o f the blade not submerged in the water – and a transitionary region of flash rust (caused by the moisture from wiping off the rust). Black rust, or black iron oxide, forms on submerged steel where the environment has a low oxygen concentration. It is also known as magnetite (Fe3O4), and provides the blade with a thin protective coating (similar to the process of  gun bluing).

rust_exp1

Fig 3: Black rust (left) and localized rust (right)

The portion of the blade not submerged in the water developed localized rust clusters due to the humidity in the jar (Fig.3-right). Fig 4. shows the blade after being submerged for two days in water – notice the rust forming on the blades surface. When disturbed, the rust settles to the bottom of the jar.

expRusting

Fig 4: The blade submerged in water


The early evolution of the metal block plane

Very few historical books mention block planes to any great extent. As discussed in the last post on block planes, there were planes prior to 1850 which were small and had a low blade angle, i.e. they were suited to end-grain and cross-grain planing. But were they block planes, or planes that conveniently fill the blanks in the history of the block plane? At the dawn of the 20th century, British books on woodworking did not make mention of many metal planes, let alone block planes – for a time they may have been a uniquely North American phenomena, from a manufacturing point. In their 1914 catalog, Norris planes (manufactured by T.Norris & Sons of London) described a series of chariot planes, and two iron thumb planes (5″ in length, one with a rosewood wedge, the other with a gunmetal lever and screw), but no block planes.

The real evolution of block planes in North America began with Stanley’s introduction of the No.9 mitre plane in 1870. Within a decade, a vast array of block planes were in existence. It is testament to the toolmaking industry in the latter half of the 19th century, and the efforts of dozens of inventors, all patenting “improvements” to planes. In 1879, the Stanley catalog offered the following block planes:

The Stanley Iron Block Planes: 101, 102, 103, 110, 120

L. Bailey’s Patent Adjustable “Victor” Planes: 0, 0½, 00, 000, 1, 1¾, 2, 2¾, 1¼, 1½, 2¼, 2½

L. Bailey’s Pocket Block Plane: 12, 12½, 12¼

Little Victor Block Plane: 50, 50½, 51, 51½, 52

“Defiance” Patent Adjustable Planes: B, D, E, F

The count? 29 different block planes. How was it even possible to decide which one to purchase?

Ironically it was somewhat of a short-term burst of planes for the next decade. The Defiance and Victor lines were bought from Leonard Bailey in the early 1880s and by 1888 they were discontinued. That reduced the number of block planes to a more manageable selection – but this small number of options was short-lived. For the next 60 years, until the decline of tool manufacturing, the variety of block planes available would balloon, expanded further by the block planes produced by manufacturers such as Sargent, Union, and the Ohio Tool Co. The Stanley catalog of 1898 displayed 20 block planes:

9½, 9¾, 15, 15½, 16, 17, 18, 19, 60½, 65½, 60, 65, 100, 101, 102, 103, 110, 120, 220, and 130.

In the Ohio Tool Company’s 1910 catalogue, they offered 23 block planes (with a numbering system suspiciously similar to that of Stanley).

09½, 015, 09 5/8, 015 5/8, 09¾, 015½, 016, 017, 018, 019, 060½, 065½, 060, 065, 0130, 0220, 0102, 0103, 0110, 0120, 0101, 0100, and 0140.

Sargent offered 25 block planes in their 1910 catalog.

4306, 4307, 5306, 5307, 306, 307, 1306, 1307, 316, 317, 1316, 1317, 606, 607, 1606, 1607, 104, 105, 106, 107, 227, 206, 207, 208, and 217

Was there a quintessential first metal block plane? It’s hard to say. There were a number of patents relating to block planes from the early 1870s, however none which relate to a specific plane, usually to improvements to one or more of the adjustment mechanisms.

Indeed, block planes evolved so quickly in the latter part of the 19th century that there is no natural order to their early design. As their genre matured, new blade holding and adjustment mechanisms appeared, and oddities such as “unbreakable” steel planes, and aluminum planes appeared and disappeared.


Tool restoration: functional or aesthetic ?

There are two basic forms of restoration: functional, and aesthetic. 

Aesthetic
If the tool works as it should, but doesn’t look very nice, then it can undergo aesthetic rehabilitation. This includes sanding/polishing metal components, cleaning and refinishing wooden parts, and restoring finishes such as japanning, or paint. New red paint on a Millers Falls hand drill however – won’t make it work any faster. An authentic restoration of Japanning on a plane using “Pontypool Asphaltum” is to be commended, but it is nasty stuff, so there is nothing wrong with using an alternate form of Japanning such as “Dupli-Color Engine Enamel DUPDE1635 Ford Semi Gloss Black”.

Functional
If the tool does not work as it should, then it has to undergo functional restoration. For example it may need a new part, rust removal, the blade may need sharpening, the sole of a plane may need to be flattened, or the throat of a plane squared up. A wooden handle may need to have a crack fixed, or a missing piece replaced – if it affects the ergonomics of the tool. A plane missing 30% of its Japanning won’t function any less than one with it’s Japanning fully restored – if the blade is tuned properly.

Consider for example, an old gouge (J. B. Addis & Sons). A gouge  has one core functional component – it’s edge. So a functional restoration involves, sharpening, honing, and polishing the edge. An aesthetic restoration could involve removing the patina from the metal, and polishing the hilt. The metal patina does not affect the function of the tool – with a keen edge, the gouge will work superbly. The handle could be sanded, and refinished with Shellac or Tung oil to produce a clean finish. Will it grip any better?

gouge_LBL

When a tool is tuned, or adjusted so that it runs smoothly and efficiently, it usually only involves functional rehabilitation. A full restoration involves returning a tool to its original “just left the factory” condition – or pretty close. This incorporates aesthetic and functional rehabilitations. The aesthetic rehabilitations improve the “looks” of the tool, however some may consider excessive aesthetic restoration to detract from the historic beauty of the tool.

For some people it is the process of restoring the tool that they love. Hand-drills/braces are a good example. These can be easily stripped, cleaned, polished, repainted and brought to a pristine state so that they can be used in the workshop. Here’s an example from Walke Moore Tools.