A tale of two wooden planes.

People often think that just because a plane is vintage, then it automatically must be valuable, right? Unfortunately the reality is not so. Sometimes, planes were, like everything else, mass-produced so their value is limited – except of course in a historical context. Here are two examples.

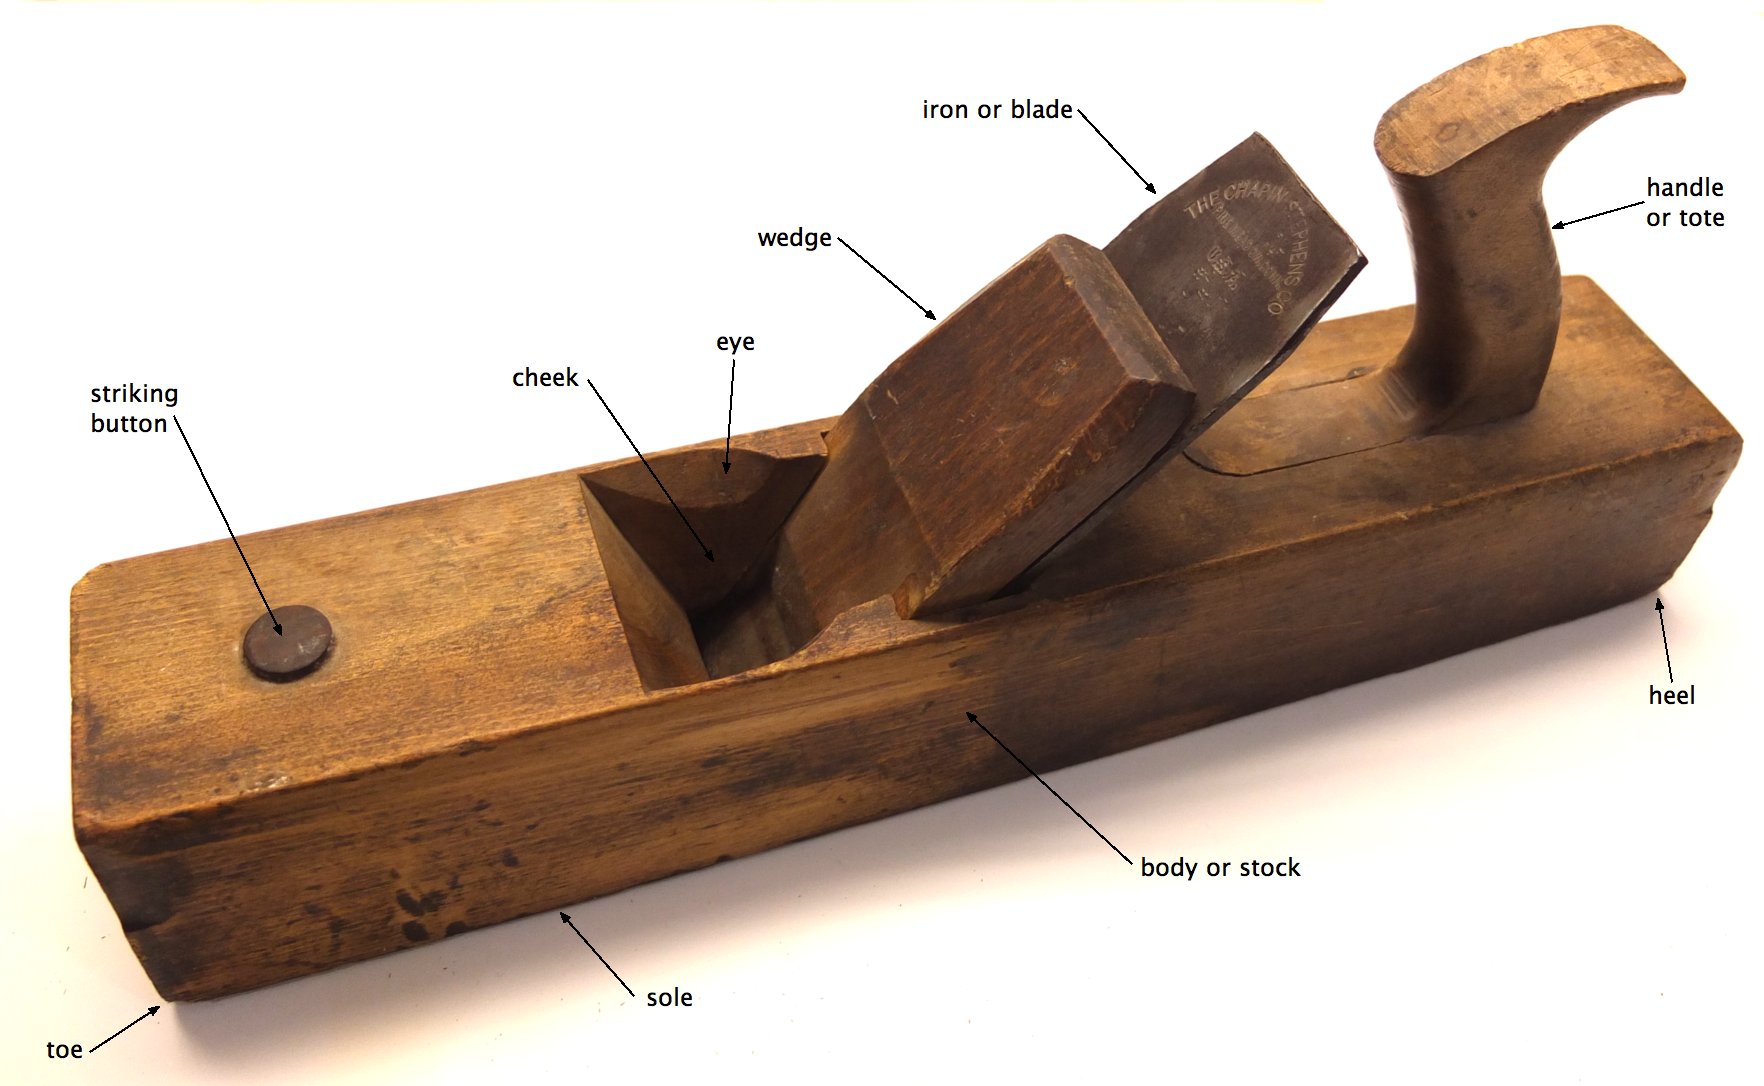
The first plane is a 16″ wooden razee jack plane made by Greenfield Tool Co. of Greenfield Massachusetts (1851-1883).

greenfield_jackS

Fig 1: Greenfield razee jack plane


This plane is a more mass-produced entity, with less regard to quality. This is evident in three areas of the plane. Firstly there are a series of vertical cracks in the toe of the plane, the largest of which travels towards the strike button, and continues through to the mouth of the plane- indicative of a weakness in the structure of the plane body. Secondly looking at the recess in the blade bed to hold the chip-breaker bolt-head, it seems somewhat poorly constructed. The closed handle offers another indication, where the inner edge shows a lack of finishing. These were likely utilitarian planes, not meant to last 100 years. Wooden plane bodies could always be replaced, blades could be re-used.

greenfield_defects

Fig 2: Defects in the Greenfield jack plane


These planes were often made of beech. Were the plane body made of straight grain (vertical), the sole of the plane will not wear easily, but had a tendency to crack. Were the plane body made of flat grain (horizontal), it will wear quicker, but not crack as easily. This plane has flat grain, so it shouldn’t have cracked as badly as it did, suggesting that the wood was not entirely dry before the plane was built, and blows to the strike button caused cracking over time. The plane may have some value as it sports  the less common closed type tote which is rarely seen on a jack plane.

pearce_jackS

Fig 3: Pearce No.109 jack plane

The second plane is a J. PEARCE NEW YORK No. 109 jack plane with an open-style tote. This “2nd” line of bench planes was sold to New York tool stores and wholesalers by H. Chapin’s Union Factory (1828-1865). Now this plane could be older, but its construction is much better. It is likely also made of beech. There are very few defects in this plane. The most prominent damage to the mouth of the plane is caused by wear, resulting in shavings that would not be very fine – which may be okay if used as a roughing plane. This can be fixed by replacing the section with a hardwood inlay. There are also some minor radial cracks in the body – the body is composed of a a block of quarter-sawn wood with the tree rings radiating out from the top-left corner of the toe.

pearce_defects

Fig 4: Defects in the Greenfield jack plane

Both these planes are worth somewhere between $10-20. Actually the tapered blade of the Pearce No. 109 may be worth more than the plane itself. At some point I will restore both planes, and post the process.

Tools of the Trades – Yes it’s already that time again.

TOTtrades

Not that much time has passed since the last Tools of the Trades show… but it’s already time for the spring show.

SUNDAY, MARCH 30th – 10am to 3pm.

Not that I have any clue what I’m looking for.  Weird and unusual block planes, the odd vintage wooden plane, maybe a couple of gouges?
Oh, and some more tool catalogs. If you’re looking for tools to start your collection, there’s no better tool show.

A small bench for small places

MTmag_bench1

Manual Training Magazine – 1914

“In constructing the vises, common bench-screws costing one dollar apiece were used. When the bench was assembled, the material, including the bench-hook, bench-stop, and vise-screw, cost three dollars and twenty-two cents.”

MTmag_bench2

The Millers Falls No.42 coping saw

Finding a good vintage coping saw can be challenging. A few years ago Christopher Schwarz wrote about the Millers Falls No.42 coping saw on his blog. Shortly afterwards trying to get ahold of a No.42 became very challenging. I searched for a few years, and as luck would have it ended up with three saws last year. What’s interesting is that the three don’t look the same – for quite a while I thought one of them was missing a part of the adjustment mechanism – but things aren’t always what they seem. This required further investigation. Fig.1 shows the catalog entry from 1938. This version of the No.42 is the one most often seen, and sports the adjustment knob at the end of the saw, which wasn’t specified in the original patent.

mf42_cat1938

Fig 1: Millers Falls catalog entry for No.42 coping saw (1938)

The patent for the No.42 appeared in 1908 (No.903,495), specified for a “COPING SAW FRAME”. The original saw frame had six parts:

  • A wooden handle with a ferrule and a recess which contains a metal socket [10].
  • A back frame [23] with an outer [26] and an inner [22] head.
  • An outer draw-bolt [29] attached to the outer head.
  • An inner threaded draw-bolt [17], which has a locking nut [19], and key [20].

Note numbers in [ ] represent the associated part on the patent drawing in Fig.2.

MF42_patent

Fig 2: Patent for the No.42 Coping Saw (1908)

Fig 3 illustrates the main components of the coping saw in addition to the two ends of the blade-holding mechanism. What is interesting about this coping saw is that the swivel head [22] has a series of notches in it, so that the blade can be locked in place. The inner draw bolt [17] contains a channel along which the key [20] containing a wing [21] moves when the nut [19] is rotated. This has the effect of locking the inner bolt relative to the metal socket attached to the handle [12].

MF42_sawframe

Fig 3: Millers Falls No.42 coping saw

The blade is tensioned by turning the handle, which pulls the threaded inner draw-bolt into the metal socket in the handle. The locking-nut is then turned towards the handle until the key engages in one of the notches. The metal insert in the handle contains both deep recesses and shallow notches. When the key engages a notch it is locked into the handle, but not the frame, allowing the blade to turn with the handle. Engaging a deeper recess allows the key to lock into one of the frames four V-shaped locking notches –  the blade now forms a rigid structure with the frame.

mf42_bolt

Fig 4: Blade mechanism

In the earliest version of the saw, the outer draw bolt [29] sits inside the outer head [26], and is held in with a flange [32]. This differs from the later version of the saw in which the outer draw bolt can be adjusted, and is held in place in the saw by a tensioning nut on the outside of the outer head. The later model also has four V-shaped notches on the outer head to allow for the blade to be locked rigid in any of four directions. There was no means of locking the outer blade in the 1908 patent model.

MF42_outerhead

Fig 5: Comparison of outer draw-bolts

In the three No.42’s I have all the handles are different – over time the handles seem to have increased in size, and material used in their construction changed. The earliest model touted a Cocobola handle, whilst the later model has a cheaper red-stained Mahogany handle.

MF42_handles

Fig 6: Handles from three different No.42’s

The last noticeable change is in the mechanism used to hold the blade in the draw-bolt. The 1908 patent uses an eyelet-type socket whereas the newer coping saws all have pin-type socket. This makes it more challenging to retrofit a pinned blade in the eyelet-socket – but not impossible.

MF42_holders

Fig 7: Different blade holding sockets

Two of the saw frames are slightly angled to accommodate a 6½” blade, the third (shown in Fig.3) only takes 6″ blades. I wasn’t able to find much of a timeline between the 1908 patent saw and the saw with the cheap mahogany handle – partially due to a lack of Millers Falls catalogs. The 1908 patent may have been adjusted to incorporate the outer adjustable draw-bolt somewhere around WW1. By the time WW2 had finished, the No.42 had disappeared from the catalog, in favour of the No.43/47, which were simpler from a construction standpoint, and likely cheaper to build.

MF43_mechanism

Fig 8: Millers Falls No.43 coping saw with the cheaper (and now standard) blade holding/adjustment mechanism

Below is an picture of the two types of sockets.  As blades with eyelet are next to impossible to find anymore, it is possible to retrofit modern pin-type blades to fit the older sockets. The new blade just needs the pin trimmed on either side, and likely the end of the blade as well. It’s not that hard to do with a Dremel.

Example showing a pin-type blade in a eyelet socket.

Krenov style plane-making workshop @ Lee Valley

Why make a plane when it would likely be far easier to buy one? One can best understand the feel for using a tool and understanding how it works by building it from scratch. Obviously tools involving metallurgy are more challenging to build, so tools made from wood are a good place to start. With this in mind I signed up for a Lee Valley workshop on plane making back in June 2013. The idea was to spend two days and build a smoothing plane in the style of Krenov. The workshop was run by Steven Der-Garabedian of Black Walnut Studio. Firstly, Steven is a great teacher, and the workshop was a lot of fun.

Preparing the stock
For first-time plane makers, obviously two days is stretching it, so Steven prepared the stock, milling the rough Jatoba blank to size, sawing and cleaning both 5/16″ wide cheeks. For the 1-1/2″ Hock blade we used, the core is 1-9/16″ in width. Jatoba is a nice tropical hardwood, which is fine grained and heavy. The first step involves marking the ramps on the core – this includes a 45° rear ramp and a 60° curved forward ramp. The rear ramp is cut using a tablesaw, and the forward ramp with a bandsaw.

krenov_1

Fig 1: Preparing the plane throat from the core blank.

Cleaning up the cavity
Next the rear bed is cleaned up using a block plane, and the rough forward bed using a cabinet scraper. When smoothing out the curved ramp of the front body block, I used the scrap piece cut out from the throat to support the acute lower edge of the sole to avoid tear-out (see Fig 2.). A 1/8″ straight chamfer is cut on the bottom of the curved ramp. A 3/4″ stopped groove is cut into the ramp of the back body block using a router. This allows clearance for the bolt head that fastens the chip breaker to the iron.

krenov_2

Fig 2: Smoothing the curved ramp, and adding the stopped groove

Bringing the pieces together
The front block, rear block, and cheeks are clamped together whilst resting on a flat surface, and the blade is positioned so that it is half-way on the 1/8″ vertical portion of the front block. Now two 1/4″ holes are drilled at each end of the composed block (on each side). The holes should be located in a part of the stock which will be removed when the plane is shaped. These dowels allow the four pieces to be registered together using 1/4″ dowels so that the pieces can be accurately reassembled during the glue-up stage. Now the scrap triangular piece can be placed back into the “assembled” plane and clamped together – this allows a 5/16″ hole to be drilled for the cross-pin, without tear-out.

krenov_3

Fig 3: Setting the throat, plane registration marks and pin holes.

The cross-pin
Now the cross-pin can be made. This involves making 5/16″+ round tenons at either end of a square-sided piece, 9/16″. We did this using a tablesaw, but it can easily be done using hand tools as well. The trick is not to make the round tenons too small, or there will be too much play in the cross-pin. Make small adjustments, and test for fit. Once it fits nicely, the top of the cross-pin is rounded.

krenov_4

Fig 4: The cross-pin

The glue-up
Once the cross-pin is done, the glue-up begins. This process uses two board covered in painting tape to hold the cheeks of the plane. Now glue the plane up using a white glue, and clamp together, leaving it 4-6 hours (or preferably overnight) to set. After gluing, the sole of the plane is flattened on a jointer, followed by 120 grit sandpaper. Alternatively it can be flattened using graduated sandpaper grits.

krenov_5

Fig 5: The “glue-up”

The wedge
The final part is to build the wedge that fits between the cross-pin and the iron, from the triangular piece of scrap. The wedge should be 2-1/2″ in length with a 7° angle, and a 45° angle at the tip. The top of the 45° angle should have a thickness of about 1/8″, the other end of the wedge should be 7/16″. The curve on the wedge was cut using a bandsaw, and smoothed using a cabinet scraper. Make small adjustments and test the fit until it holds the iron firmly in place.

krenov_6

Fig 6: Making and fitting the wedge.

The “nearly finished” plane
Here’s the quasi-final product. From here, the body will be contoured to create an aesthetically pleasing plane – I’ll get to that once I finish my work-bench. How does it cut? Sweeeeeeetly!

krenov_7

Fig 7: The “semi” finished plane.

For specific measurements, I’ll refer you to David Finck’s excellent book – Making & Mastering Wood Planes. My goal is to eventually design more wooden planes, and recycle old metal plane bodies into hybrid infills. Stay tuned!