Dovetail characteristics circa 1900

We talk a lot about dovetails these days, but how were they perceived over a century ago? Paul Hasluck, in “The Cabinet Worker’s Handybook” (1907) describes dovetailing as “the most general form of jointing in cabinet work”. Yet while Hasluck describes the process, even mentioning puzzle and round-cornered dovetailing, he doesn’t go into specifics.

Fig.1: Examples of dovetails from The Cabinet Worker’s Handybook.

Below is a description on dovetail proportions and angles from a 1910 book “Modern Cabinetwork: Furniture and Fitments“, by Percy A. Wells, and John Hooper. The authors were from the Shoreditch Technical Institute, which would become the London College of Furniture.

  • Setting out Dovetails − The ratio between dovetail and pin varies according to the work in hand. Thus, in draw work, the pins are very narrow, and the dovetail large (Figure 3a). This makes a strong joint, and is not unsightly or cumbersome. Carcass dovetails that are concealed by plinth or cornice have the pins cut larger, the ratio of pin and dovetail being 1:3 (Figure 3b). Cistern dovetailing required to resist the heat generated when soldering the lead lining, have both pin and dovetail equal, any shrinkage which may then occur is evenly distributed throughout the whole case (Figure 3c).
  • Angle of Dovetails − The angle for cutting dovetails to obtain the maximum amount of strength from the joint may be either 1 in 6 (9.5°) or 1 in 8 (7.1°). It will be found advantageous to cut exterior dovetailing, such as drawers, instrument cases etc. where they must have a neat appearance, 1 in 8, and the heavier types of carcasses, bases, and chests, 1 in 6.

Many woodworking instruction books of the period did not specify an angle as such, or suggested that the angle of the sides of the “tail” should not exceed about 15°, for hardwoods a little more, and soft, weak woods as little as 10° [1] (note that many older texts specified angle from 75-80°, see the Figure 2). A 1 in 4 dovetail has an angle of about 14°.

Fig.2: Different ways that dovetail angles are expressed
Fig.3: Different dovetail spacing
  1. Bernard Edward Jones, Every Boy his Own Mechanic (1919)

Is there a future for dowels in furniture making?

Let’s talk about dowels. For years they have been the lesser cousins when it comes to joinery for furniture. They are often as maligned as butt-joints, but is the “dislike” warranted?

There are of course many ways to join two pieces of wood. For joining corners the most popular method is often dovetails – for aesthetics alone. Are dovetails always practical? You can make them by hand, or use a jig and router to speed things up, but they aren’t the be-all-and-end-all. Hidden joints are done in many ways – some people like using the tenons of Festool’s Domino system (the system is nice, bit pricey for the home user), others sliding dovetails (nice looking, but a lot of work for being mostly hidden), and still others use dowels.

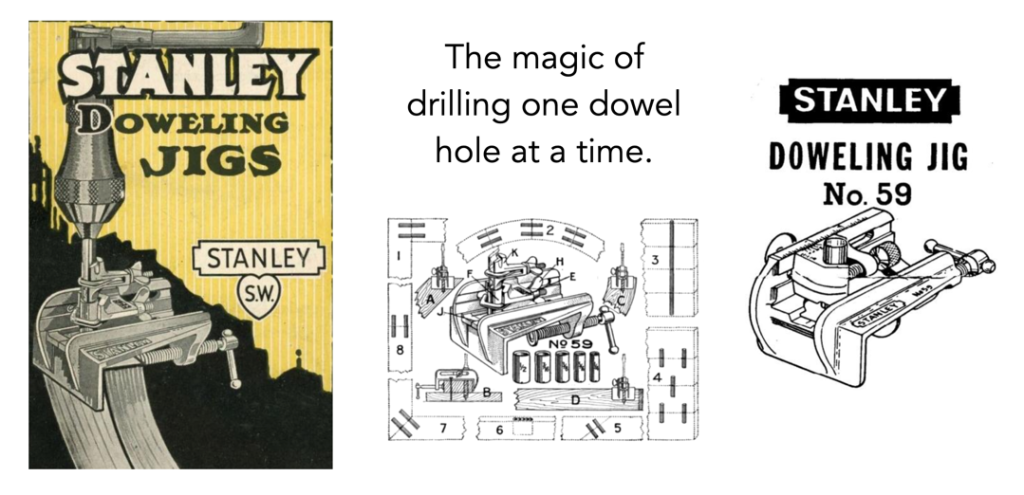
The Stanley No.59 dowelling jig

Plain old dowels. The word dowel is an old English word analogous to “doule” which simply means a part of a wheel. It can also be traced its history in the Middle German language “dovel” which meant to plug. Now dowels have been around for quite a while. Viking longboats used trunnels (tree-nails or big dowels) to hold ribs together, and dowels were used to pin structural members joints together in buildings. However the use of dowels in furniture construction came as a late development, appearing in the early 19th century as an alternative to mortise-and-tenon joints.

For many years many woodworkers have shied away from them. This may be in part because of poor experiences with dowels in a certain self-assembly flat-packed furniture. But dowels are actually ideally suited to building with plywood, especially Baltic-birch. The multi-layered form of plywood is not well suited to the likes of dovetails, or mortise and tenon joints. It is also an ideal way of joining solid wood.

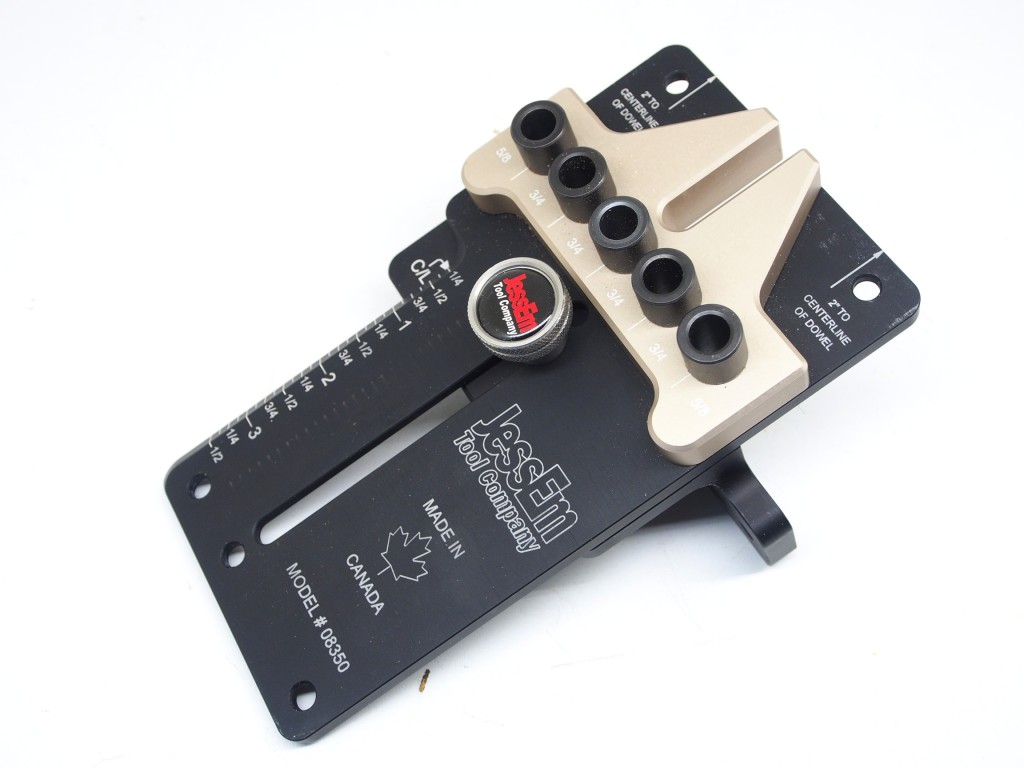
It also may be because the old-type dowel-jigs have always been somewhat mediocre. They weren’t really designed for placing dowels along the edges of large cabinet carcasses, or on mitre joints. The early ones, like the Stanley No.59 were versatile in application, but suffered from only being able to drill one hole at a time. The newer ones include the Veritas Dowelling Jig, which is good at some tasks, but not the most optimal solution , and the Woodpeckers Ultimate Dowelling Jig 2.0, one of their OneTIMETools… too short lived to form any sort of opinion on. But then there are what some consider the game-changers, the DOWELMAX and JessEm jigs. These tools let you put dowels in just about any configuration (each has its own pros and cons).

The Dowelmax…
or the JessEm?

Then there is the dowel pins – spiral-grooved or multi-groove. The grooves, or flutes allow air to escape and glue to fill the voids as the dowels are inserted. Without them, it is possible that the dowels would not be able to be inserted completely into the hole. There is no real definitive answer as to which has the better holding power, but both are infinitely better than smooth dowels (unless the dowels are to be used in through-dowel situations where they are exposed). The dowels are generally like pressed-beech biscuits, with the compressed wood in a ⅜” dowel expanding about 1/32″ (0.8mm) on contact with moisture in the glue, creating a tight fit.

Dowels offer a convenient, inexpensive way to make a robust joint. They can give incredible strength to mitre-joints, and make carcass joinery quite efficient. Whether you choose to use them is really up to you, but they offer a method of joinery that is both inexpensive and sturdy. But how strong are they really? Well we will tackle the concept of dowel strength in the next post.

The Knapp joint

This dovetail-like woodworking joint has many names – pin-and-cove, pin-and-crescent, pin-and-scallop, half-moon, or scallop-and-dowel joint, but is not a joint readily encountered in modern woodworking. This is because it is a machine made joint, and would likely be quite tedious to produce by hand. During the Victorian era, industrial manufacturing of furniture was becoming more the norm, and new techniques were invented to replace the construction of time-consuming joints, such as hand-cut dovetails. In 1867 an inventor from Wisconsin by the name of Charles B. Knapp invented what was to be known as the Knapp joint (US Patent No.63,532). In 1870 Knapp sold the rights to the machine to a group who would form the Knapp Dovetailing-Machine Co. in Northampton, Massachusetts who began producing the machines that would make the joints.

The pin-and-cove joint on the side of a drawer

In 1870, Knapp received a patent for the joint itself (US No.D4,302). These joints were used predominantly in the construction of drawers. The drawer side was scalloped to fit into the drawer fronts matching scallops, and over the drawer front sides protruding pins.

The Knapp illustrated in Patent No.388,760

Knapp together with Nathan S. Clement (of Knapp Dovetailing-Machine Co.) improved on the machine design in 1872 (Patent No.122,390) and Clement patented a faster machine in 1888, the Clement Dovetailing Machine (US No.388,760) which when run by a single workman could produce 200 drawers in a 10-hour shift.

These joints were used for 30 years, however as the Victorian era waned, so to did the popularity of the pin-and-cove joint. Eventually machines would be developed which were able to cut traditional dovetail joints that looked hand made versus the Knapp joints which look machine made.

The rear of the drawer, held together with through dowels

Interestingly, the drawer which I photographed used through dowels to hold the back of the drawer into place. These seem quite messy, but then nobody expected to look at the structural components of the drawer. In fact the use of pinned rabbet joints is just as viable a solution as normal dovetails. This simple joint may have been the inspiration for the Knapp joint.

Sometimes simplicity is key

Before I decided to go down the path of a Roubo-type bench, and bought all the hardware, I should likely have considered a much simpler design, although I may have been caught up in the world of optimal, aesthetically pleasing joinery. Sometimes, it likely is not needed. I might have had a simpler, existing workbench, versus one where the wood has been acclimatizing for 10 years (I blame home renovations and work). Why don’t we just use screws to hold things together?

Consider the following picture for the leg assembly of an English style bench (English Mechanic and World of Science, No.1589, pp.54, 1895). Both cross pieces are simply glued and screwed onto the legs (likely with a #14 screw). The joints are a simple lap, and T-halving, simple, with the screws exposed (the legs are 3″ by 3″.

As humans we tend to overcomplicate things at times. Things that were once simple have become needlessly un-simple. Of course screws and glue are not a substitute for good joints, but there is no doubt such joints would suffice for a makeshift work-bench.

Messy vintage dovetail joints

It is always fun to explore old furniture when travelling, mostly to see how it is constructed. We recently stayed in an old country house in Caputh, Scotland, and there was a neat dresser in one of the bedrooms. Looking back at the evolution of dovetails we often forget that joints were once just that – methods of holding together two pieces of wood. Early use of dovetails in details such as drawer joinery was very primitive – certainly not to the standards of todays micron-precision cuts. Older dovetails were different.

Cuts were often made beyond the dovetail. In the figure below, notice how deeply cut some of the tails are, in addition to the intensely scored layout line marking the shoulder of the pin socket. This is a half-blind dovetail from the front of the drawer.

The pins are quite skinny, and likely would weaken the joint were it not for its half-blind structure. The number of dovetails were also different depending on whether the joint was on the front or rear of the drawer – the front has five pins, the rear, only three. Below is a picture of the rear dovetails. The tails are again cut beyond the shoulder, but this time the angle is 20° which falls to the other extreme, potentially leaving some unsupported grain at the corners of the tails.

Finally, consider the back of the drawer. This was truly a case of  “part of the furniture never to see the light of day”. It almost seemed like a piece of scrap wood.


A different perspective on joints and trim

When I travel I inherently start looking at how things are constructed. Sometimes I think there is a huge misconception about how wooden things are made. Talk about joints and many think dovetails are the ultimate in joints – but few stop to remember that dovetail joints are quite new from the perspective of being such a widely use joint (although they have been around since Egyptian times). Many vintage pieces of furniture, and indeed things like doors made heavy use of mortise and tenon joints. The joint below is from a door in a historic Norwegian house (in Bergen) – the through mortise-and-tenon is wedged with large wedges.

A wedged mortise-and-tenon on a door

Another interesting thing is doors with recessed panels. Conventional thinking would have the frame built for these doors using blind mortise-and-tenon joints, with the panels likely recessed into the door. However older doors often had through mortise-and-tenon joints, and used external moulding on both sides to retain the panel. Not quite what one would expect. Is it lower quality because of this? Hardly.

Recessed panels

Painted or raw, the mortise-and-tenon joints look good, and they tell  story. The external moulding turns into a feature of the door versus a bland piece of household architecture. When did our doors become so boring (and heaven forbid hollow)?


Old joints were messy

We like to think that joints should be nice and clean, crisp. But that was not always the case. Functional furniture had functional joints, even if they weren’t pretty. Below is a half-blind dovetail joint from a drawer in a vintage piece of furniture. Notice that the pin is thin, over-cut, and irregular in shape. In this drawer there are four pins, and three long tails. The joints are rough, but fit together well, and produce a joint with character.

oldDovetail3

Christopher Schwarz in his latest book The Anarchist’s Design Book, talks about the fact that we have been “ruined by plastic and its inhumane smoothness“, that we look for smoothness everywhere, including the inside of a chest of drawers. Real hand-made furniture does not need to be perfect. Perfection is for engineered things, such as jet turbines.

It is okay for joints in furniture to have a disheveled appearance, as long as they do their job.